Delegate Tracker - User Guide
Delegate Tracker - No more need to manually create spreadsheets for your groups and events bookings.
Introduction
Our customers told us they find tracking and collating multiple booking files related to an event or group time consuming and error prone.
Creating large event bookings in the GDS often leads to inflexibility when each delegate for an event wants to do ‘something different’, such as fly out the night before everyone else, or fly with a different airline etc.
Keeping all these bookings together and updated means manually creating various spreadsheets and remembering to regularly update them with any changes actioned in the GDS – Delegate Tracker solves a lot of these problems.
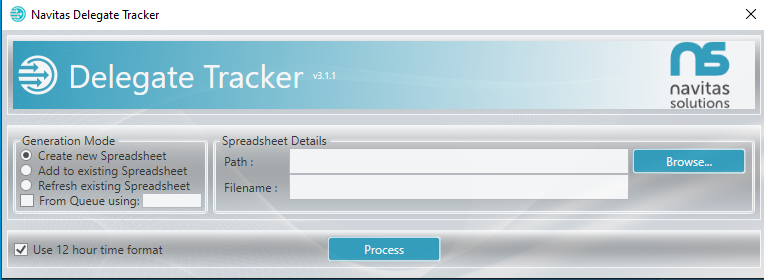
Create new spreadsheet
Create new Spreadsheet will take details from the current PNR and add to a brand new .xlsx file. The user must provide details of the path and file name to be used when creating the spreadsheet.
Clicking Browse on the interface will allow the user to select the folder, but they must provide the filename (with or without the .xlsx extension) before they can proceed. Add the Filename and hit tab.
If the user selects a filename that already exists they are prompted if they wish to overwrite the existing .xlsx file.
To use; Select Create new Spreadsheet from Generation Mode. Browse to select where you want the spreadsheet to be saved. Finally give the file a name, and hit Process!

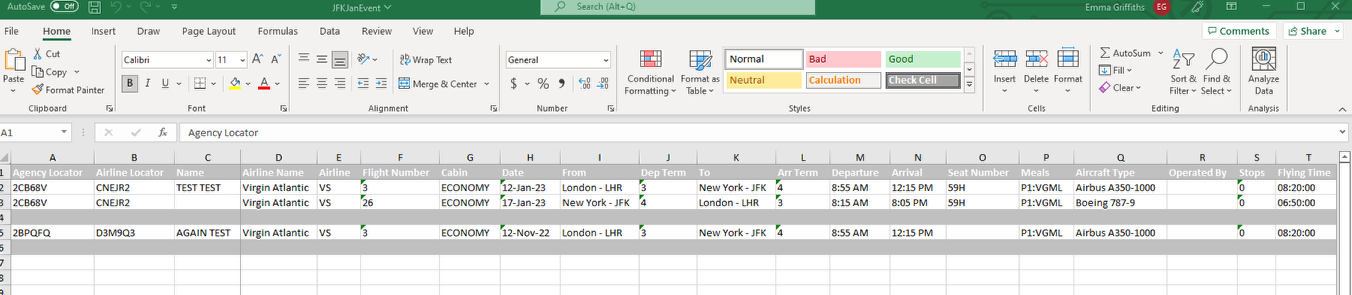
An Excel spreadsheet is created using a customisable template so your agency can build spreadsheets exactly to your specifications.
The latest version of Delegate Tracker now allows our customers to have customised layouts of the output spreadsheet.
This includes: column header name, cell styles and formatting, column headers order, and much more!
We are now able to display baggage and CO2 emissions information.
Add to existing Spreadsheet
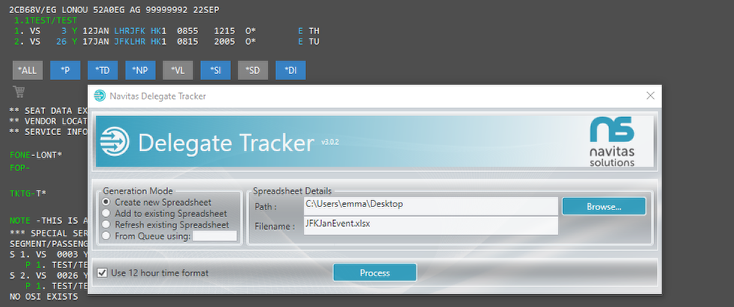
Add to existing Spreadsheet After the initial spreadsheet has been created, additional PNR’s can be added to it using this function.
Clicking "Add to existing Spreadsheet" will take details from the current PNR and add to the specified .xlsx file. Use the Browse... button on the interface to select the specific .xlsx file to be used during processing.
The system opens the existing Excel file and determines the last line where data can be added.
To use; Select Add to existing Spreadsheet from Generation Mode. Browse to select the spreadsheet you want to add to. Hit Process!
Multiple "Sheets"
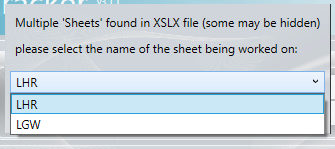
XSLX files can have multiple Sheets, for example all LGW flights on one sheet and all LHR flights on another.
When using the 'Add to existing Spreadsheet' or 'Refresh existing Spreadsheet' functions, if multiple sheets are found then the user is prompted to select which Sheet is being worked on.
The relevant Excel spreadsheet is updated with the new PNR data!
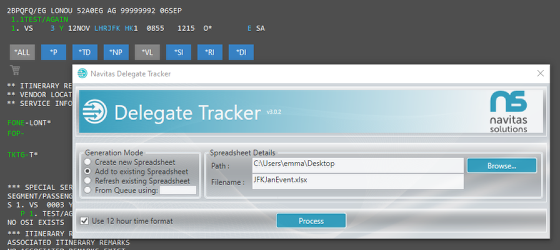
Refresh existing Spreadsheet
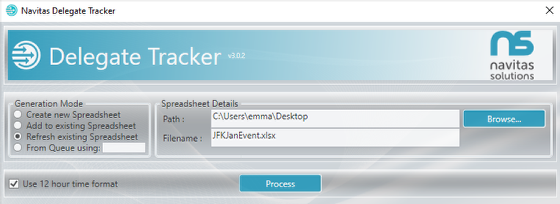
Refresh existing Spreadsheet Overtime, information about the flights and fares can become out of date, such as status updates, time changes etc.
To ensure easy resynchronisation with the GDS, this function automatically cycles through all the Record Locators in the selected spreadsheet and updates each line with the latest information.
Clicking Browse on the interface allows the user to select the specific .xlsx file to be used during processing.
To use; Select Refresh existing Spreadsheet from Generation Mode. Browse to select the spreadsheet you want to refresh. Hit Process!
NOTE: If there is a PNR open in the GDS, it will automatically be ignored so that we can retrieve each Record Locator listed in the Excel file.
Build From Queue
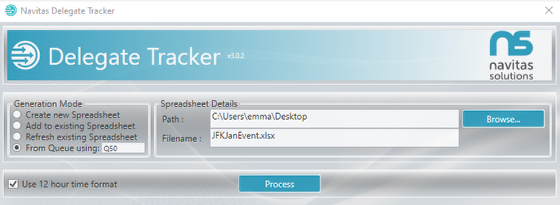
From Queue allows users to build a brand new .xlsx file based on PNR's placed within a Queue in the GDS. This functionality also works with Add to existing Spreadsheet.
Simply provide the full Queue details as per the normal GDS entry (including any Category or Date Range information if required), the filename to create or add to, and Delegate Tracker will move through each PNR on the specified queue, adding it to the spreadsheet. Obviously if you have a number of PNR's on the queue, this can take some time to process them all.
If you use the 'Add to existing Spreadsheet' with the 'From Queue' feature, then the system will also only add any NEW PNR's it finds on the queue that haven't already been added to the spreadsheet previously. Any record locators that already exist in the spreadsheet are skipped over. If existing PNR's in the Spreadsheet need updating, use the Refresh From Spreadsheet option instead.
To use; In the Generation Mode section, select either 'Create New Spreadsheet' or 'Add to Existing Spreadshetet', then select the 'From Queue using' checkbox. Add the required Queue details using the standard GDS queue entries. Browse to select where you want the spreadsheet to be saved. Give the file a name, and hit Process!